Saturday, July 20, 2019

PORK CHOPS WITH RED EYE GRAVEY

Ok, I admit it. I love Southern Soul Food. Most of my favorite Internet cooks make Soul Food, and I am always on the hunt for a good Soul Food Recipe.

This recipe was not advertised as Soul Food. But it does have the main Soul Food ingredients. Pork Chops, Gravy, and huge portions.

All is good in life.

One of my favorite You Tube Chefs is the "One Pot Chef"

https://www.youtube.com/user/OnePotChefShow

Check him out. I have made many of his recipes.

The reason I mention him is to bring us to a ONE SKILLET meal.

Pork Chops with Green beans and Red Eye gravy.

Lets take a look at what our goal is with this one.


Doesn't that look good??? Let see if we can duplicate it.

Here is what you'll need.

First, an adult beverage.


And a helper


  Let's get started.
 

2 TBL Vegetable Oil

¾ lb Fresh Green Beans (snapped)


1 ¾ tsp kosher salt

1 tsp ground black pepper


4 Nice Pork Chops (about ¾ inch thick)


½ Cup chopped Country Ham


¼ Cup Finely chopped Onion


1 ½ Cups of Chicken Broth


½ Cup water (if needed)


½ Cup of Brewed Coffee


1/3 Cup All Purpose Flour


½ Cup of whole Milk


1 TBL Creole Mustard

1. In a 12 inch cast iron skillet, heat 1 TBL oil over medium high heat. Add the beans, ½ tsp salt, and ¼ tsp pepper; cook, stirring frequently, until beans are crisp - tender & light, About 8 minutes.


 Remove from skillet. Loosely cover and keep warm


2.     In the same skillet, heat 1 TBL oil over medium heat. Sprinkle Pork Chops with salt and pepper. Add chops to skillet and cook until your meat thermometer reads 145 degrees in the thickest part of the chop. (about 4-5 minutes per side). 


Remove and loosely cover to keep warm.


3.     Add ham and onion to skillet, cook until lightly browned (about 3 minutes) Stir in broth and coffee, scraping browned bits from the bottom of the skillet with a whisk. 


4.     In a small bowl add the flour. Whisk in the milk, ¼ tsp salt, and ¼ tsp pepper. 


Whisk milk coffee into the milk mixture, bring to a boil, whisking constantly, Reduce heat to simmer and simmer until thickened to your liking. (2 to 3 minutes) 

Here is where I messed up. Sorta.  I started step 4 too early. My gravy started out LUMPY and UGLY. I had a train wreck on my hands.


 Then Penny pointed out that I had totally skipped step number three. So I added step 3 to step 4 and it all came out fine.

Moral of the story: Slow down. Don't rush

If it is too thick you can add the water. (I did not need it)  Whisk in the mustard.


5.      Place the pork chops back into the skillet and surround them with the beans. Using a large spoon, spoon some gravy on top of the chops.


Serve with an adult beverage (or two)


 We pulled a couple of twice baked taters out of the freezer to go with our meal. Preheat oven to 350 and cook until taters are good and hot. (about 45 minutes) 


I can not tell you how good this was. You gotta make it. It only takes about 45 minutes and is well worth the effort !!!!!
  
So, how did I do ???  

 Magazine picture

and my version 


You decide.......

Live Long and Prosper.  And keep COOKING !!

Wednesday, July 17, 2019

TOMATO BEEF BARLEY SOUP IN THE SLOW COOKER

      I love soup and sandwiches. On a busy day, they are a quick and easy way to get a great meal, WITHOUT GOING OUT TO EAT....

     Today's inspiration comes from my favorite Slow Cooker Cook Book. The Slow Cooker Revolution from America's Test Kitchen.


    We have been watching them on PBS for many years, and Penny has most of their cook books.

     I find that a lot of their recipes are geared for the more intense cook. They get a bit complicated, but this book works for me.

    If you are going to cook on a regular basis, this is one book you should have on your shelf. It is a great resource for us beginners.

      Our soup is a variation of theirs. They used a Blade Steak and cooked it whole then shredded it before serving. I went the other direction, using CHUCK and cutting it up first. 

     I also adjusted some of the ingredient amounts to suit our tastes, and what we had on hand.

     That's what I love about soups. You don't have to follow a recipe. Once you get the basics, you can add what ever the hell you want.

     If you get the book, give their version a try as well.

     Let's get started

     First things first.


     Here is what you need


2 TBL Vegetable Oil

1 Large White Onion Chopped Fine

 (I hate it when a recipe calls for one onion chopped. How BIG is the Onion? Is it a White, Yellow, or Purple Onion??? They called for 3 Onions. Need more info folks..... I used ONE LARGE Onion. That worked fine for us)


¼ Cup Tomato Paste

¾ tsp Dried Thyme

½ Cup Red Wine

1 (28 once can) Crushed Tomatoes


I did not have "Crushed" Tomatoes. so I ran these through the blender. (2 - 14 ounce cans)


4 Cups of Chicken or Turkey Broth
( or 2 cups of the above and 2 Cups Beef Broth)


2 Carrots, peeled and chopped medium


1/3 Cup SOY Sauce

1/3 Cup Barley

2 Pounds Chuck Roast (Cut into bite size pieces)


Meat Tenderizer

Salt & Pepper to taste

¼ Cup minced fresh Parsley

Cut up the beef and place into a bowl. Sprinkle with tenderizer. (mix well with your hands or a spoon) Set aside for about 30 minutes


Heat oil in a 12 inch skillet over medium high heat until it shimmers. Add the onions, tomato paste, and Thyme. Cook until onions are softened and slightly browned. (8 to 10 minutes) Stir in the wine, scraping up any browned bits and put it all in the slow cooker.


Stir tomatoes, broth, carrots, soy sauce, and barley into the slow cooker. Season the beef with a little Salt and Pepper. Place into slow cooker.


    Cover and cook until beef is tender and carrots are cooked well. (9-11 hours on Low or 5-7 hours on high) Stir occasionally.

     I did 2 hours on medium, 5 hours on low, then 3 hours on medium

 Now you have time for another beer.


And the dog is waiting for 'playtime'


Give it a try after a few hours and Salt & Pepper to taste

When done, serve with a nice sandwich.


 Nice Roast Beef Sandwich made on the Panini Press 

 I feel like Guy Fieri

 And a Grilled Cheese


LEFTOVERS ? YOU CAN FREEZE THIS !!!

Empty slow cooker into large container. Place a frozen water bottle and cool the mixture to 75-80 degrees. Place in refrigerator to finish cooling. Transfer into freezer containers.


 Almost cool enough for the cold box

Cooking HINT 478

When chopping the Onions and Carrots, put the "cut offs" in an empty juice or paper milk carton. Do the same when you cut off the Celery ends when you make your salad. Place it in the freezer and use them the next time you make broth. You are making broth, right??


Live Long and Prosper

Wednesday, July 3, 2019

FIXING STORE BOUGHT PIZZA

Those of you that know me, know several things:

1 - I hate going out to eat.
2 - I love a cold beer.
3 - I hate prepared and frozen foods from the grocery store.
4 - I love PIZZA  (and a cold Beer)

With that being said, today we are going to FIX a store bought pizza.

When I was growing up in Indiana, we always went to PIZZA KING, a popular Indiana chain of Pizzerias.


Since moving from Indiana in 1989, I have tried many different kinds of pizza. Our favorite was a local spot in Sarasota Florida, called Honey Crust. It was fantastic. (although they sold out a few years ago).


We currently have 3 pizza spots with in two blocks of our home in Ocala. We've talked about Roma's on these pages. They have good food. I prefer the Meatball Sub and their Burgers.


We also have a MARCOS  PIZZA


  and a Pizza Hut.


One of our favorite local spots is the BLUE HIGHWAY Pizzeria.


We have ordered from all of them and Blue Highway was by far the best.

The only problem is the price. The last time we ordered from Pizza Hut, the bill was close to 25.00 dollars. Add in a five dollar tip for the delivery person and you are close to thirty bucks for a pizza. 

Convenient ? Yes. Worth the money ?  HELL NO.

Not acceptable.  

 
That's why we usually make our own pizza here at home.


But every once in a blue moon, when in a pinch, it's nice to just throw something in the oven. Then you sit on the porch (with a cold beer) while it cooks.


Last week, Penny and I were spending our morning at Sam's Club,
 

and I spied a pre made, take it home and cook it PIZZA.

I mentioned to the boss that maybe, just maybe we could fix it. So we decided to give it a shot.

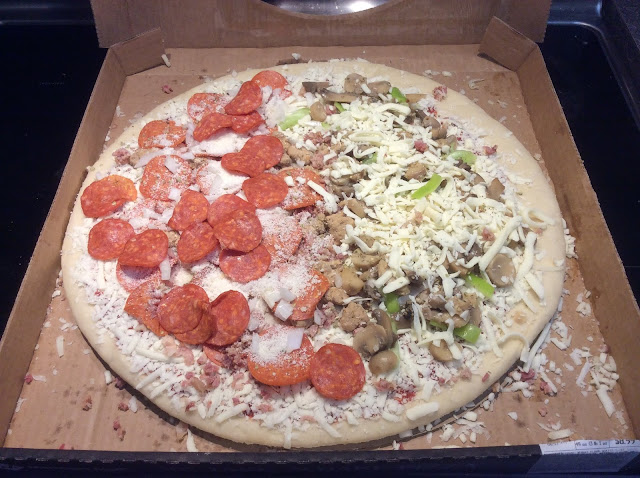
Here is what we took home.


Now, let's gather a few things to jazz it up.

Onions
Green Peppers
Mushrooms (for me)


Extra Pepperoni (for her)
Red Pepper Flakes (also for her)


Oregano


MORE Mozzarella Cheese (for me)

and some Garlic Salt
 
Now let's fix it up.


 I started by moving all the Pepperoni to one side (for her) I can take or leave Pepperoni. (I would rather leave it)

Add fixings to your liking. I like onions, green peppers, lots of mushrooms, and a boatload of of cheese.

Penny likes 4 tons of Pepperoni.

She stuck in some Parmesan Cheese on her half 

The directions said to bake it right on the oven rack.  I imagine that is to keep the bottom crisp.

We cooked it according to the directions on the box. The only thing we did different was to use the "convection" setting


When I removed it from the oven, I removed the rack along with the pizza and just set the whole thing on top of the stove. We cut the pizza with a large pair of cooking scissors, thus keeping the bottom up in the air (on the rack)

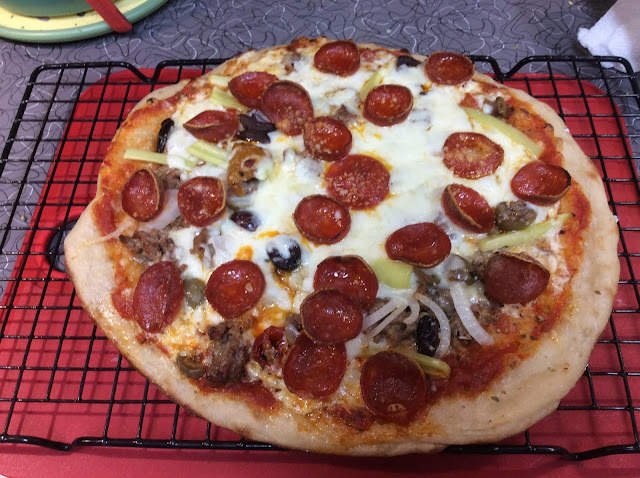
Here are the results:


I was shocked. It was damn good. More crispy than carry out pizza in the box.


The best thing of all:  IT COST 10 BUCKS.    Not $30.00  Add another dollar each for the extra ingredients and we each got  Pizza for 6 Dollars

Yes, our home made is better, but is more labor intensive.

I can eat this pizza every once in a while.

Give it a try, you'll thank me later.

Live Long and Prosper, Keep Cooking !!!!